
STEP 1: THE TUBE AND ITS LANDMARKS
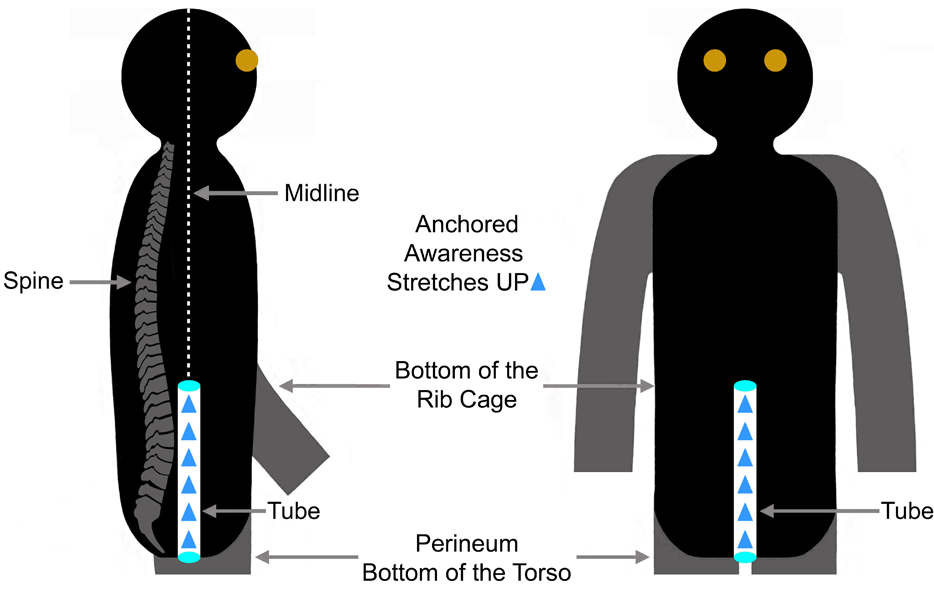
In this lesson you’ll imagine a tube inside your body. However, it’s possible to imagine this tube and still project its location forward. So, after imagining the tube, you’ll be asked to actually feel the tube on the body’s front-to-back midline as depicted in the graphic below. Each of this lesson’s steps will extend the tube by locating “landmarks” on the midline, which will anchor awareness and prevent forward drift. When you learned the belly breath, you located two of these landmarks – the Perineum at the bottom of the torso, and the bottom of the rib cage. Notice their locations below.
WHAT YOU WILL PRACTICE
First, you’ll imagine a clear tube about an inch in diameter extending from your Perineum up to the bottom of your rib cage. Next, you’ll feel this tube on the body’s front-to-back midline. Then, you’ll anchor your awareness at your Perineum. You’ll begin a belly breath by inhaling and extending your awareness, stretching it up the tube to the bottom of your rib cage. You’ll hold your inhalation without locking your muscles. Finally, you’ll exhale effortlessly. Read this paragraph until the sequence of steps is clear. Then practice several times with the audio below.
Click Below to Hear Audio -- Practice several times, eyes closed
STEP 2: THE FUNNEL
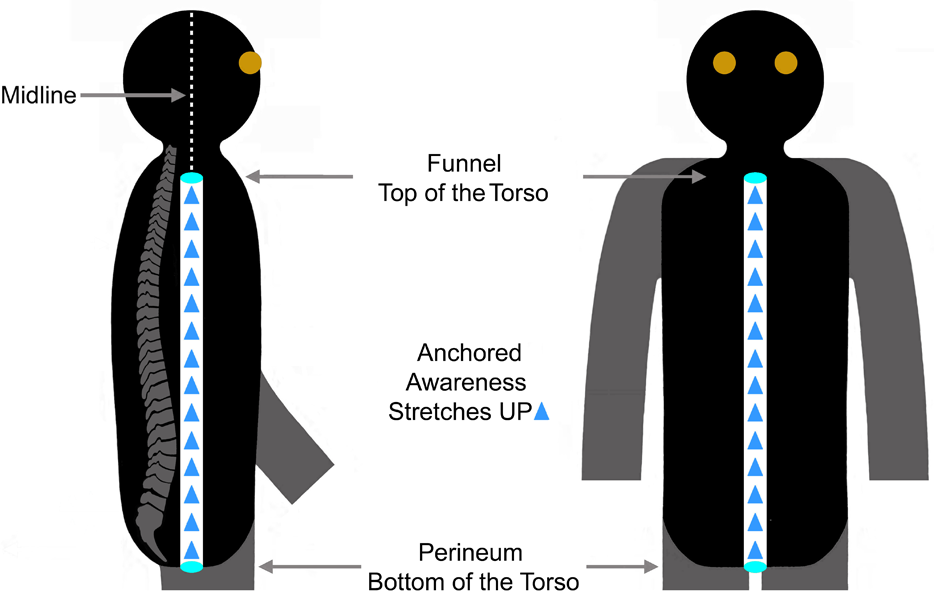
At the bottom of the rib cage the body is relatively deep, front-to-back. This makes it hard to feel the body’s midline here. However, the next landmark depicted in the graphic below is much easier to feel on the midline. This is where the sternum at the top of your chest, and the spine at the top of your back, curve inwards towards each other. This narrowing at the top of the torso creates a “funnel” that concentrates sensation as you stretch awareness through this landmark. As you practice the exercise below, stretch your awareness from the Perineum straight up to the Funnel.
WHAT YOU WILL PRACTICE
First, you’ll imagine the tube extending from your Perineum up through your rib cage to the Funnel at the very top of your torso. Next, you’ll feel the tube on your body’s front-to-back midline Then, you’ll anchor your awareness at your Perineum. You’ll begin a belly breath by inhaling and stretching your awareness straight up the tube to the Funnel’s focused sensation. You’ll hold your inhalation without locking your muscles. Finally, you’ll exhale effortlessly. Read this paragraph until the sequence of steps is clear. Then practice several times with the audio below.
Click Below to Hear Audio -- Practice several times, eyes closed
STEP 3: THE PALATE
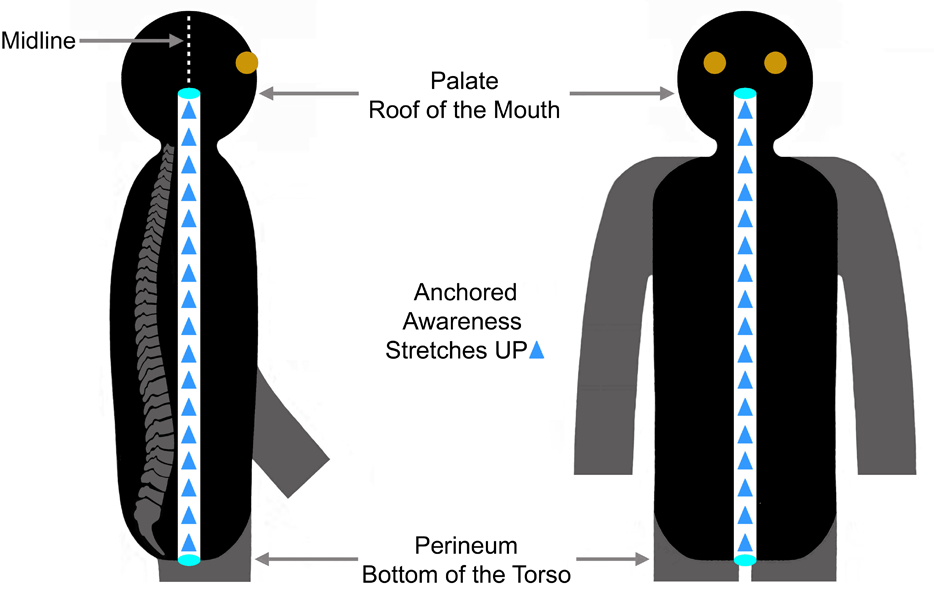
Notice all the locations in the figure below, including the next landmark at the roof of the mouth. Place one of your thumbs on your gums behind your upper front teeth. Run your thumb up to the roof of your mouth. Then, very slowly move your thumb back until you begin to feel the tissue soften. Go no further. This is the soft palate. Press gently on this sensitive area and remove your thumb. Then, place your awareness briefly at this landmark. As you practice the exercise below, you will likely notice that a belly breath inhalation exerts gentle pressure on the Palate.
WHAT YOU WILL PRACTICE
First, you’ll imagine the tube extending from your Perineum up through your rib cage to the Funnel at the very top of your torso. Next, you’ll feel the tube on your body’s front-to-back midline Then, you’ll anchor your awareness at your Perineum. You’ll begin a belly breath by inhaling and stretching your awareness straight up the tube to the Funnel’s focused sensation. You’ll hold your inhalation without locking your muscles. Finally, you’ll exhale effortlessly. Read this paragraph until the sequence of steps is clear. Then practice several times with the audio below.
Click Below to Hear Audio -- Practice several times, eyes closed
STEP 4: THE FONTANEL
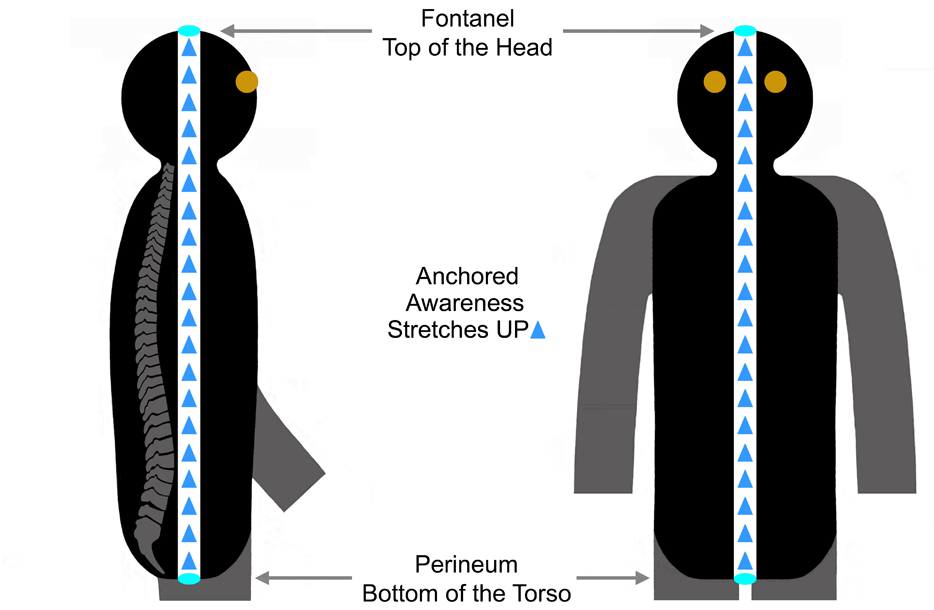
Notice all the locations in the figure below, including the next landmark at the top of the head. Place the tip of one of your middle fingers on the very top of your head. Explore this area until you find an indentation or an area of increased sensitivity. This area is an acupuncture point. It’s also an area where babies have a soft spot, called the Fontanel, before their cranium bones fuse. Rub the Fontanel briefly and drop your finger to your side. Then, place your awareness on this landmark. Notice the subtle sensation that can be felt at the Fontanel.
WHAT YOU WILL PRACTICE
First, you’ll imagine the tube extending from your Perineum, up through the Funnel and Palate, and on up to the Fontanel at top of your head. Next, you’ll feel the tube on your body’s front-to-back midline. Then, you’ll anchor your awareness at the Perineum. You’ll begin a belly breath by inhaling and stretching your awareness up the tube, through the Funnel and Palate sensations, and on up to the Fontanel. You’ll hold without locking. Finally, you’ll exhale effortlessly. Read this paragraph until the sequence is clear. Then practice several times with the audio below.
Click Below to Hear Audio -- Practice several times, eyes closed
STEP 5: THE EYES
Some readers may have an aversion to bringing awareness to their actual eyeballs. If that’s the case for you… When asked, bring awareness to the area around your eyes – your temples and your lower forehead. Notice in the graphic below that each eye has four muscles that control eye movement. These muscles move the eyes when you think. And you think all the time except in dreamless sleep. This eye movement is usually too subtle for you to notice. Yet for many, these constantly active muscles combine with projected thinking to propel the sense of self forward into the eyes and the area around the eyes.
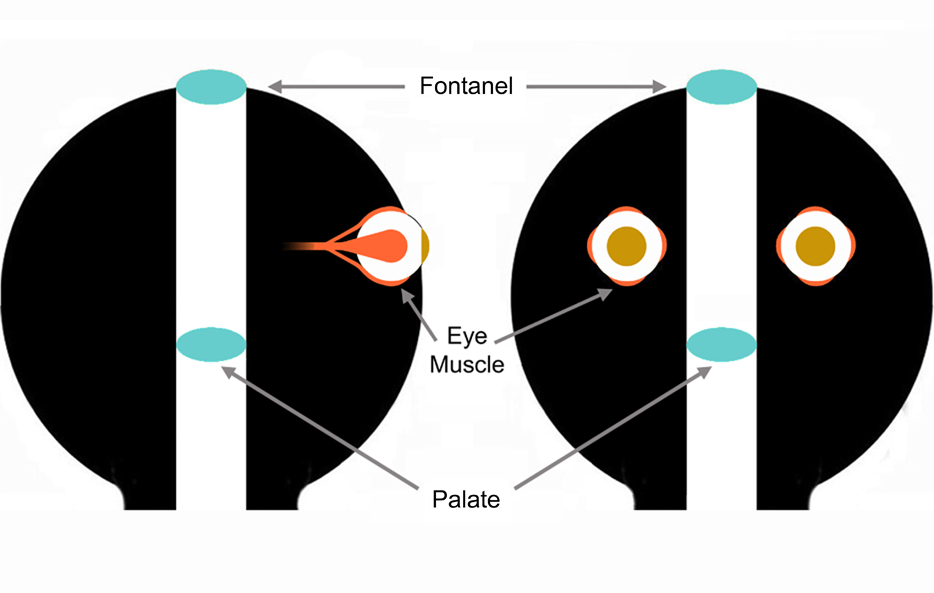
WHAT YOU WILL PRACTICE
First, you’ll imagine the tube from the Perineum to the Fontanel. Next, you’ll feel the tube on the body’s entire midline. Then, you’ll anchor at your Perineum. You’ll begin a belly breath by inhaling and stretching awareness, through the Funnel and Palate, to the Fontanel. You’ll hold without locking and notice the sensation between the Palate and Fontanel. Then, you’ll shift awareness to your eyes before exhaling. Finally, you’ll notice how far you had to shift awareness forward from the midline. Read this paragraph until the sequence is clear. Then practice several times with the audio below.
Click Below to Hear Audio -- Practice several times, eyes closed
INTEGRATING THE LANDMARKS
It may be useful to review the first four steps once more. This will reinforce how stretching your awareness up the tube through the landmarks keeps your awareness on the midline. Because it’s so easy to project awareness forward to the area of the eyes, it may be useful to review step five more than once, especially if you find that the sensation at the Fontanel is not as perceptible as the sensations at the Funnel and the Palate. In the last lesson one of the landmarks is dropped and others are consolidated, making the technique much simpler. So, once you’re comfortable staying on midline, go on to the last lesson.