LEARNING AT YOUR OWN PACE
Individuals vary greatly in how they perceive their bodies, and in their ability to feel internally. In order to address these differences, the technique is presented in more detail than many will need. Some individuals will master the technique quickly. Others may want to spend more time on each lesson. So, practice each lesson until it feels natural and comfortable, then move on. The first lesson shows you how to breathe from your belly. The second lesson shows you how to feel internally. The third lesson couples these internal sensations with belly breathing to create an “intentional breath.”
THE INTENTIONAL BREATH
An intentional breath is a belly breath that you decide to take. As you inhale, you’ll direct awareness into the central core of your energy field, which runs from the bottom of your torso to the top of your head. As you exhale, you’ll allow your awareness to expand and fill your entire torso and head as a pleasurable, energetic sensation. Thoughts will inevitably capture your awareness and replace this sensation. When you’ll realize that this has happened, you’ll take another intentional breath. Each new intentional breath increases the sensation of your life force and reduces the power of thought.
TYPES OF PRACTICE
In solitary practice, a series of intentional breaths produces a sensation that many describe as feeling like their energetic life force. But when you’re out in the world, a single intentional breath can redirect your awareness inward, giving thinking a temporary “time out” and allowing you to center yourself. Once learned, the technique is best integrated into your life in three phases: 1) a solitary phase practiced when you’re alone and still, 2) an active phase practiced when you’re alone but mobile, and 3) a social phase practiced when you’re engaged in the challenges of interacting with others.
IMPORTANT LIMITATION
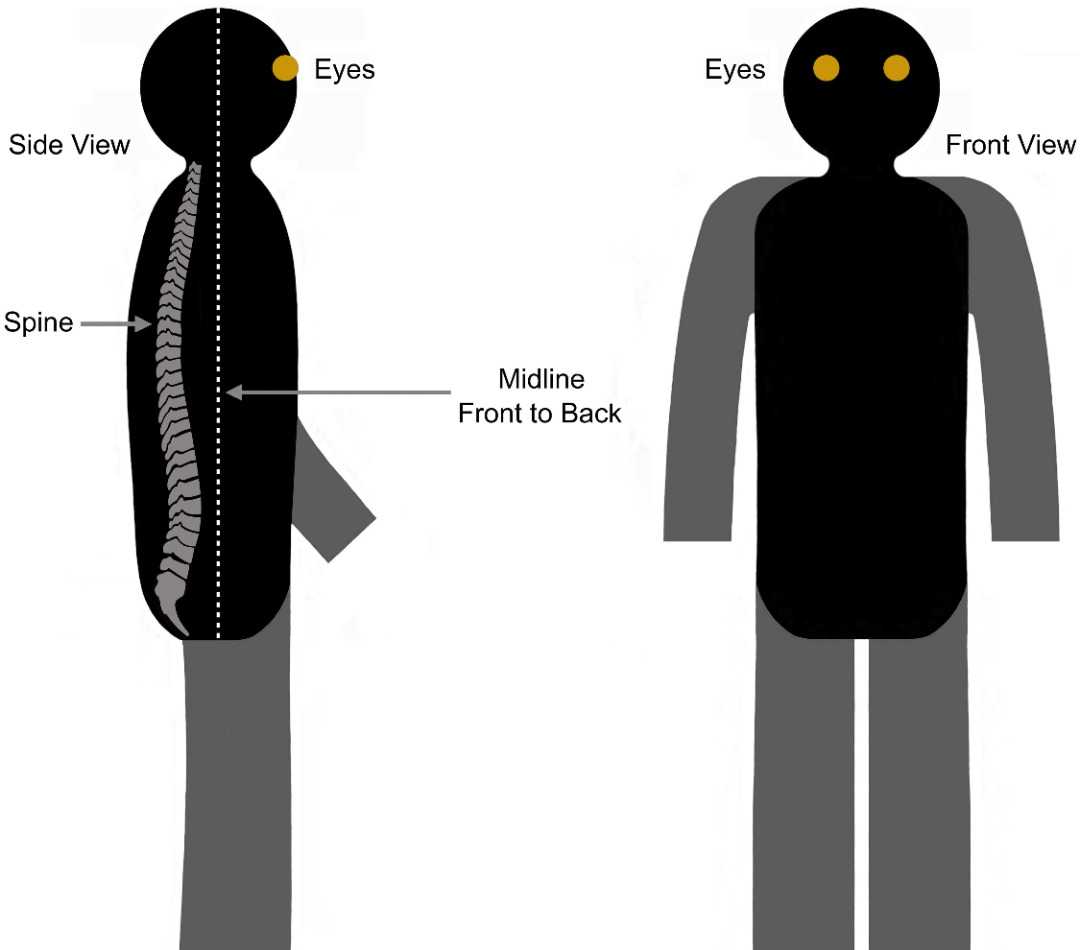
The Deep Embodyment technique can help most of us to easily release stress. However, there are a few of us who — knowingly or not — have suffered more serious stress still lodged in the body as unresolved trauma. If you experience anxiety or discomfort of any sort while practicing the technique, stop until possible underlying trauma is diagnosed and resolved with professional help. Here’s some useful links. Also, note that this is not a kundalini technique. As the following graphics indicate, awareness is guided along the body’s midline in front of the spine. There is no focus on the spine.
IMPORTANT LIMITATION
The technique can be used to redirect awareness while you’re engaged in daily activities out in the world. Therefore, don’t practice the technique while you’re engaged in any tasks or activities where focusing your awareness on the task or activity is critical to your own safety or the safety of others. Specifically, don’t practice the technique while operating any type of vehicle or heavy equipment. In addition, don’t practice the technique while you’re under the influence of any substance or technology that could affect your consciousness or reduce the focus of your awareness.
NAVIGATING INNER SPACE
As you begin to explore the depth of your inner space you may feel like a stranger in a strange land. The graphics in these lessons map a few inner “landmarks” that will help you navigate this unfamiliar territory. These landmarks will help you create a central anchor in your inner space that will prevent your awareness from drifting forward. This drifting is due to the mind’s tendency to project not only thoughts but sensations. The technique’s first objective is to help you to truly feel inner sensations, instead of projecting false sensations forward. So, the landmarks are the technique’s foundation.
THE EYES AND THE LIMBS
Because vision is so critical to navigating the perceived world, it’s not surprising that the sense of self often migrates forward to the area around the eyes. Notice in the graphic below that the eyes are located at the front of the body, well beyond the body’s midline. This is obvious to the thinking mind. But as we’ll see later, it’s useful to experience this spatial relationship as an actual sensation. Also, notice that the arms and legs are “grayed out” below. The technique focuses on the head and torso, the only areas of the body needed for rediscovering your true depth and your vertical orientation.


GENERAL GUIDELINES
These guidelines apply to all lessons. Sit on a bed with your legs extended or crossed. Or, sit in a chair with your feet on the floor. Keep your back relatively straight but comfortable. Keep your chest relaxed and still, as you’ll use only your belly muscles to breath. Inhale slowly through your nose. When your inhalation is full, hold the inhalation briefly without locking or “clinching” your muscles. After this brief hold, exhale easily through your nose by allowing your belly to collapse slowly towards your spine. Before continuing to Lesson 1, notice all the positions in the graphic below.

WHAT YOU WILL PRACTICE
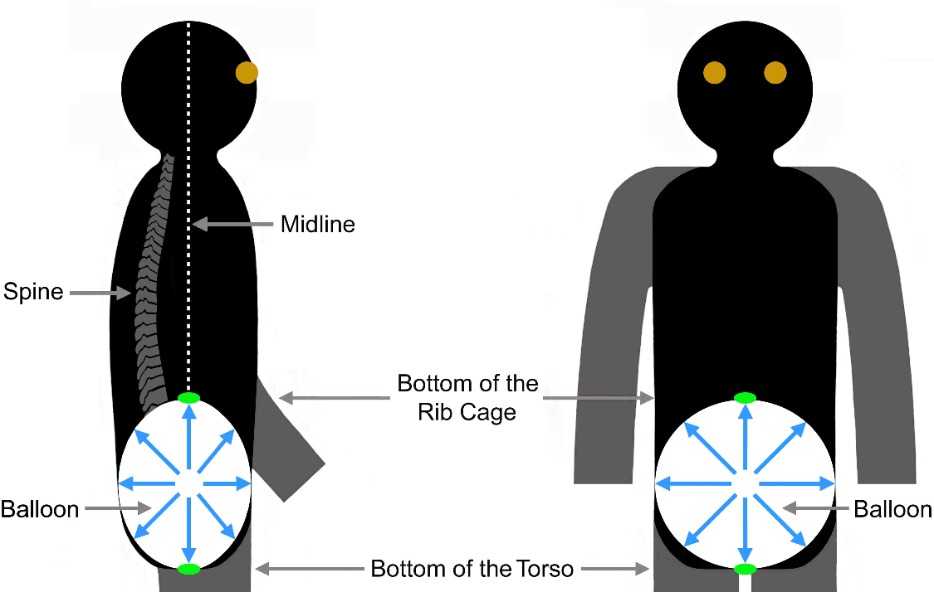
You’ll imagine an empty balloon halfway between your navel and backbone. You’ll keep your chest still as you inhale slowly through your nose inflating the balloon in all directions You feel it push your navel forward and your sides outward. You’ll feel it press back gently against your kidney area. You’ll feel it press up against the bottom of your rib cage and down against your perineum at the bottom of your torso behind your genitals. You’ll hold your full breath without locking muscles. Then, you’ll exhale allowing the balloon to slowly deflate. Read this again. Then practice with the audio.
Click Below to Hear Audio -- Practice several times, eyes closed
INTEGRATING THE BELLY BREATH
As you continue to practice with the audio, occasionally read the more detailed text above the audio link. Practice with the audio until the expansive sensations throughout your belly replace the need for the balloon image. With a little practice these pleasant and expansive belly sensations will generate “muscle memory” as your body acclimates to this more efficient and healthy way to breathe. Then, begin to practice – eyes closed– without the audio. When you can simply decide to take a belly breath and allow your body to automatically take over, you’re ready for the next lesson.